Very nice....
http://www.alisandifer.com/index.php
(Found via Design-Milk)
Tuesday, July 28, 2009
Sunday, July 26, 2009
Everyone's a Critic.....
....And a comedian!

OK lovers of symetry, I have caved in to your taunts and jibes...
I hope you're happy about crushing my dream.

The Sugi Saga
Saturday was a crazy day - Friday afternoon had shown the limits on 2 grown men's ability to lift 500 lbs with their bare hands (and a teacher and a finance guys' hands at that - not a powerhouse combo). But with a mound of lumber and 2 big logs up in the condo courtyard I had to go to plan "B", not that I had a plan B. So Saturday morning I went up the street to MLK and hired 3 day laborers to help me with the beasts.
Somehow, someway, we were able to roll the 2 heavy logs down the courtyard, slowly let them go down the stairs, and then put them onto the back of the pickup.
We did this twice, and I didn't think we were going to make it. It's amazing what some brute force can do mixed with a little determination.
Next we had to move all of the rest of the logs down to the sidewalk. This was not fun. I think a few of my laborers kind of lost some steam; granted, the heavy lifting was done. I later listed all of the wood on Craigslist and it was gone by the end of the day.
I didn't know if the Ranger was going to be able to take these logs all the way out to the burbs. (The guy who cut them said they probably weighed 500 lbs a piece, and a coworker told me my weight limit on the truck was probably that much.) I took the back roads out to the place where the guy at Rose City Lumber will mill them up for $0.50 / board-foot. It took him a while to meet me there, but there was a definite sense of accomplishment once they were safe and sound off the truck (and the truck still worked).
(BTW - 'Sugi' refers to the type of wood this is - I found out by posting a question on Lumberjocks...)
Just a little bit of wood....


Finally off the truck....

Friday, July 24, 2009
Am I Ready To Iron Clothes?
I was able to get the hall table dry fit this week with the lower shelf in place. Lots of little things are out of place and need to be fixed and adjusted, but I was able to get the basic premise of what it would look like.
In person, I'm OK with it. In looking at a photo, not so much. I don't know what it is about the camera - it seems to add 20 pounds just like it does to actresses.
We had some friends over last night, and the one comment was "it looks like an ironing board", which is correct, it does! I didn't think that I was pouring a lot of time on a a piece that looks like something you buy at Target for 12 bucks. But apparently I have. Oh well - I'll continue on but I'm convinced that I need to cut down the long end to minimize the old ironing board effect. Originally I thought it would be nice to have some asymmetry going on, but maybe that isn't a good thing.
Is it a table......


....or an ironing board???


New Lumber or Just Heartache?
The trees from the condo I still own were coming down (finally) this week. 2 Japanese cedars and one maple. The maple wasn't going to yield any usable lumber, mostly because it was in such an odd location. The cedars, however, would be prime candidates. Something this nice can't come easy though.
Logs in the Truck.... (the small ones)
The trees are down and I enlisted the able bodies help from Pete to help take the lumber to the truck. This would have been in the realm of possibility, but the logs from the trees were located in a courtyard, and there are about 12 stairs down to navigate. (Hey, could have been worse, it could have been 'up' instead of down.)
To make a long story short, there were 2 very large logs (about 24" dia) that were too much for 2 mere mortals, even if they were incredibly buff and good lookin'.
Not one to swallow my pride, I can't just leave the big logs up there. So it's on to plan "B", which is to hire some help and use some mass manpower (there should be at least 4 of us there tomorrow morning). I'm not thrilled about Plan B, but I want those logs, and plus there's some other firewood that I have to get down to the curb. Ugh!!!
Japanese Cedar Trees


Logs in the Truck.... (the small ones)

Sunday, July 19, 2009
Hall Table Moves Ahead
I was able to get a few things done today on the hall table. Namely, I added the through mortises that the 'pegs' will go through on the shelf, cut the shelf tenons down to size, and added the dovetail grooves for the drawers.

Then I spent some not-so-quality time planing down the stock for the drawer frame / cabinet. I decided to keep the sides maple, and for the top I pulled out the yew board that I purchased a few months ago. After planing it, it was lighter than I imagined, but I think that will change once the finish goes on. I don't know if the drawer fronts should be a different species, otherwise it might look like Joseph's multicolor jacket, or some rasta white dweebs' coat. (Duuude, that's mellow!!!) Probably I'll just go for the yew for the front...
The dovetails for the case couldn't be cut without some type of mistake, and that's what you'll see in the picture below. Luckily, the piece was way long so unlike my usual wont, I wasn't up #!&$* creek without a paddle.

Saturday, July 18, 2009
Broken Chisel
This past week while working downstairs I experienced a complete system failure..... OK, maybe a tad bit over dramatic, but one of my chisels broke in half. It sucked, because not only had I just sharpened this one, but this was the one that was ground and sharpened by a pro last summer (Gary Rogowski) at the NW WW Studio during my 2 week joinery class. Granted, I can regrind the bevel on it after a lot of work, but I didn't think this was supposed to happen. In the words of Franzie upon gazing at said object- "man, you shoudl be able to beat on chisels all day long and this shouldn't happen!"
I might take this to one of the WW blogs to see if this is a normal occurance. I'd hate to buy my Lie Nielsen chisels this xmas only to have this happen to one of them.
Pop goes the weesel...

This was odd, the metal was different colors. I'm no metalurgist, but this don't look right to me...

Sunday, July 12, 2009
Mult Co Library Rocks
The Multnomah County library has to be one of the best in the country. What other library could I rent weird & obscure Japanese PLUS a good assortment of the Tauton woodworking videos. (OK, and a chicken care video too, but that's another blog entry...) 

Columns (Maaah-buhl Kah-lums!!!)
No, the front porch columns are not actually made of marble, but that would be really cool and would make a great skit on SNL. They're all wood, and the base on the main one we have to walk by every single day has been rotted out since day 1 when we moved in 2 years ago. I attempted to repair it a few weeks ago, but it was a no go.
Abra-Cadabra - I have floated the Kah-lum

Instead of using the fancy schmancy Lee Valley Scrooge clamp, I went with a borrowed ten dollar Harbour Freight bottle jack and a 2x6. After some trial & error I was able to push up the column and get to the base, or plinth block. It was funny because it was as if it was levitating of its own accord. All fun & games until....

Instead of using the fancy schmancy Lee Valley Scrooge clamp, I went with a borrowed ten dollar Harbour Freight bottle jack and a 2x6. After some trial & error I was able to push up the column and get to the base, or plinth block. It was funny because it was as if it was levitating of its own accord. All fun & games until....
ANTS!
There were ants everywhere in the rotted out board. I grabbed our bug spray and tried to fume them out, but in the end it was easiest to just root them out with the crow bar and scraper.
Now, I wasn't actually prepared for repairing the block - I was a bit surprised that I actually got the darn thing off the porch. So I had to run out to get some PT lumber to make the base. It was 12" square, so I cut 4 triangles that would meet up.
Installation was a bit, well, sloppy. In my typical lackadaisical manner I assumed as I put the first block in position that since it was in the same position as the former block that it was where it should be. Wrong.... it was actually about an inch too far to the right, and out of center to the column. I knew I had really screwed up royally when Melissa identified this error. She usually doesn't have an eye for such, ahem, detail.
I put additional exterior grade spackling on it to cover up any openings (and possible ant holes) and put more caulking to make sure it was all sealed up today. Tomorrow I can put some flexible molding on it and then apply paint. (I wouldn't want to make a habit of using the flexible molding - at $5 per foot it doesn't come cheap!)
The base in place... out of place. (The column for a piece that came off and was glued back on...)


Wednesday, July 8, 2009
Hall Table Progress
Things are coming along on the hall table. It now stands on its own two feet, so to speak. This means the top mortise & tenon are complete, and so it's on to the shelf m&t.
When I attached the legs to the top, I found out that they extend beyond the 'side' of the table (because of the curvature of the top), so I'll have to cut down the legs somewhat, but I'm thinking about approaching this by tapering them. I'm hoping that will look cool, as opposed to dorky, or un-cool. (???)
For the shelf, I went ahead and did the 'right' thing by ripping the board in half so that I could joint each piece on my 6" jointer. (I considered trying to flatten it with my planes - maybe after I have a real bench). I wasn't too fond of this method, but I can't deny that the board will come out overall flatter because of it.
Next up will be cutting the tenons on the shelf, and then trying to figure out what exactly I'm going to do with the drawers. 4 drawers? 2 drawers? No drawers? Hmmm, what will it be?
Leg with the tenons

On its own 2 feet - I hope it doesn't walk away...

Edge gluing the shelf - hopefully it will stay flat...


Tuesday, July 7, 2009
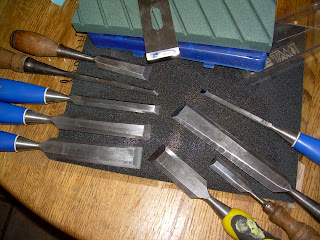
Not so scary sharp
I needed to sharpen my chisels this past weekend and what was supposed to be a light touch up turned into a 2 hour ordeal because I had the bright idea to sharpen some of the 'vintage' chisels I've collected over the past year or so as well. The bevels had to be set on the grinder, and then the backs flattened as well. I don't think I'm good to go on the backs, but there's only so much flattening I can do in a day. I did try the first stage of the 'scary sharp' method, which is basically putting sandpaper on glass and using it for the sharpening surface. Worked pretty good, I have to say - better than the coarse DMT stone I picked up used, but then again it was a lot coarser.
An old Stanley brought back to life....

By the end there was no hair left on the back of my hand that gets the 'is-this-sharp-enough-to-shave-with' treatment....
9 Chisels & 1 Plane Blade ready to cut

An old Stanley brought back to life....

Saturday, July 4, 2009
Deck Chairs Back from the Dead (chilling at the beaches out at club Med)
Last summer I made some highly functional deck chairs, and from all sources it came from Woodcraft magazine, and Scott Philips no less, the arbiter of woodworking cheese (IMHO). However, these actually have a somewhat modern look and feel, and they're very comfy to sit in since they have a nice 52" radius curvature, which fits the back nice and comfy like.
The plan called for using white oak, a nice outdoor wood that's very strong - oak, obviously, very beefy wood. Myself, being the rather frugal sort (who, ME!?!?!) made the foolhardy decision to go with cedar, this being many degrees cheaper, and also a wood commonly found in my basement last year following the deck project which was also built out of said species.
Well, in the span of about 10 days this spring, 3 out of 4 of the deck chairs met their demise, each one having a leg break off while someone was doing nothing more than sitting in it. Not only was this somewhat embarrassing, but of course the sitter felt guilty and I felt like an idiot for making such a poor decision.
I went ahead and purchased white oak a few months ago at the local purveyor of $1 / bdft wood, but my bargain soon turned into a burden as I found that the wood was still wet as a clam, or about 25% MC. Foiled again....
So I put said stock up to dry - and having recently purchased a dehumidifier found that after a few short weeks the MC reading was down to 10%! So I went ahead and made more legs for two more chairs, happy that I would have real deck furniture again.
After an afternoon of sitting out in the 90 plus degree weather, imagine my horror to see some really large cracks developing in the legs. Aghghghhhhhh!
Looks like the dryness in the wood was very surface, and it was still pretty wet in the middle....
Oh well, maybe someday I'll learn that it doesn't always pay to save a buck (but it was a lot of bucks).
2 more deck chairs, soon to be cracked....

The Scrooge Kluge!
The current bane of my existance is the rotted plinth block at the base of our porch column. It's just one of those things that I've been 'meaning' to get to for the longest time. Yesterday seemed as good a time as any, so I finally brought out the tool I purchased for the job - a funny named clamp called a "Scrooge" clamp that I bought from Lee Valley over a year ago.
Ugly Rotten Plinth

I proceeded to cut the support 2x4 to size and even hand cut it to the exact length out on the porch. As I started turning the clamp rod, I got the feel that it wasn't going to work. I was right. With only the smallest amount of pressure applied, the threads in the clamp started binding, the top 2x4 started buckling, and it was obvious that this was a bad idea. ErrrGGGG!!!!
The Scrooge in Action - or not as the case may be

What now? Master craftsman Franzie says I should use a bottle jack and that he can loan me one - I really hope that will do the trick. The battle with the rotten plinth still rages. I have lost the battle this time, but hopefully the war is not lost for good.
The battle rages - defeat inevitable for today though


Subscribe to:
Posts (Atom)

